Overview
Sometimes, a requirement arises where you may need to receive data from a trading partner via the Webhook connector but that partner might require a bit more security other than just the basic auth username/password that is used to authenticate inbound webhook requests - or maybe you just want to add an additional layer of security on inbound webhook messages.
Using the custom response feature of the webhook connector, you can actually create your own HTTP signature authentication logic to perform some additional authentication on inbound webhook requests, via the use of an HMAC signature value assigned to a header on the request.
GitHub has a good writeup about this, and this is what has been used to make the below example within CData Arc - https://docs.github.com/en/webhooks-and-events/webhooks/securing-your-webhooks
The Script
This script is one that I wrote within the Response event of the Webhook Connector attached to this post:
<!-- setting the secret key value to be available globally -->
<arc:set attr="secret.key" value="test" />

<!-- specifying the HMAC format, key value, algorithm, bits and output to result in HMACSHA256 -->
<arc:set attr="encIn.format" value="HMAC" />
<arc:set attr="encIn.hmackey" value="[secret.key]" />
<arc:set attr="encIn.hmacalgorithm" value="SHA" />
<arc:set attr="encIn.hmacbits" value="256" />
<arc:set attr="encIn.outformat" value="HEX" />
<!-- setting the data that should be included in order to create the hash. this is the body of the request -->
<arc:set attr="encIn.data">[_message.body]</arc:set>

<!-- generating signature HMAC hex digest hash -->
<arc:call op="encEncode" in="encIn" out="encOut">
  <arc:set attr="calculated.signature" value="sha256=[encOut.encodeddata]" />
  <!-- comparing the signature on the request to the signature calcuated above -->
  <arc:if exp="[_httpheaders.X-Hub-Signature-256 | equals([calculated.signature | tolower()])]">
    <arc:set attr="_response.write"><Status>Success!</Status></arc:set>
    <arc:set attr="_response.statuscode" value="200" />
    <arc:set attr="_response.statusdescription" value="OK" />
    <arc:else>
      <arc:set attr="_response.write"><Status>The signature provided in the request did not match the expected signature. The expected value is [calculated.signature | tolower()]</Status></arc:set>
      <arc:set attr="_response.statuscode" value="401" />
      <arc:set attr="_response.statusdescription" value="Unauthorized: Signature Mismatch" />
      <arc:throw code="500" desc="The signature provided in the request did not match the expected signature. The expected value is [calculated.signature | tolower()]" />
    </arc:else>
  </arc:if>
Further explanation about the parts associated with this script are provided below, but each main section of the script above includes a comment <!-- --> that outlines what that section of script is doing. The main ArcScript operation used here is:
encEncode - https://cdn.cdata.com/help/AZJ/mft/op_encEncode.html
Implementation
The way GitHub’s webhook requests work is that it will send a POST request to the configured API endpoint, in this case, CData Arc’s Webhook Connector, each time a push event happens for one of my repositories. This is just specific to GitHub but the idea here can be transferred to any other automated system or even to a custom implementation that has the ability to send REST requests.
For test purposes, my "secret" is just a simple string of "test".

Once a push event happens, GitHub sends a POST to the URL with some JSON data. GitHub calculates the HMAC hex digest using the secret and the body of the POST and includes it as a header (X-Hub-Signature-256).
Once this request reaches the webhook connector, the custom script actually builds the same HMAC hex digest using the secret and the intercepted body of the incoming request, compares it to what was included within the X-Hub-Signature-256 header and then creates an appropriate response based on the result.
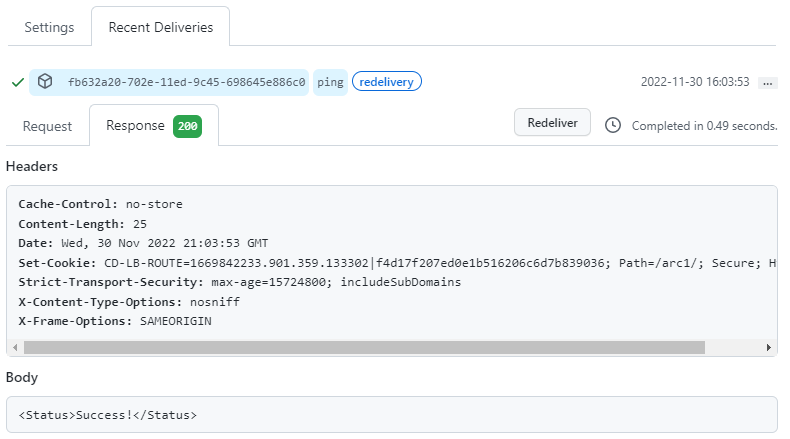
If the signatures match, the request is accepted and a 200 OK is returned to GitHub (i.e. the client):
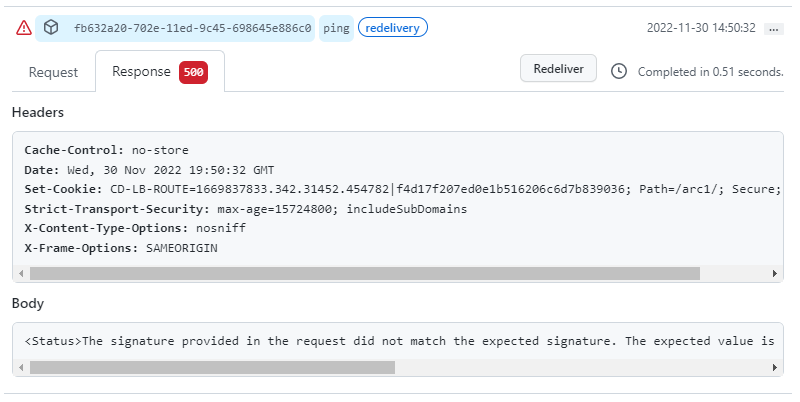
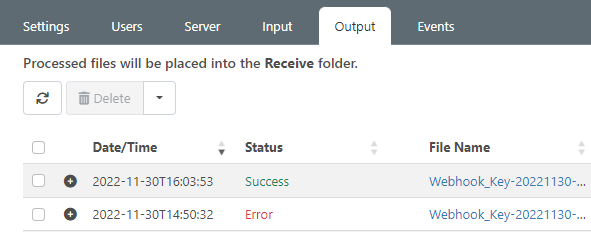
If there is a mismatch in the signatures, the request appears as "Error" within the Output tab of the Webhook connector and as a 500 error in the response back to the client (GitHub):
Successful requests show as "Success" in Arc:
Additionally, for failed requests, the custom error thrown by arc:throw can be seen directly within the log file:
[2022-11-30T19:47:57.468] [Error] The signature provided in the request did not match the expected signature. The expected value is sha256=26bf09c078ddcf555a6a7cbd362c70e18e7233d0e4cfb056d2e00bc3ba8ee5e4
Please feel free to take this example and modify it in any way that you need to fit your specific use case. For more information about the response event of the webhook connector, please check out the documentation here: https://cdn.cdata.com/help/AZJ/mft/Webhook.html#custom-responses