OAuth 2.0 Overview
In today’s standards, OAuth 2.0 is becoming increasingly popular as a means to authorize users who are attempting to access a resource, be it a mail server, API endpoint or database. A common example of this shift is the deprecation of basic authentication in Exchange Online (Microsoft’s mail server for Outlook), which can be read about in more detail in Microsoft’s article, here.
OAuth 2.0 is an authorization protocol and not an authentication protocol; a means of granting users access to a set of resources - in the case of what is discussed here, that resource would be a mail server.
At a very high level, OAuth 2.0 can be summarized in the following steps:
-
The connecting client acquires both a client ID and a client secret from the authorization server.
-
The client requests to be authorized by the authorization server by providing their client ID and client secret. Additionally, any necessary scopes and a redirect URI are also provided.
-
If the supplied credentials are correct, the authorization server will authenticate the connecting client.
-
The authorization server redirects back to the client using the provided redirect URL and provides an access token (and sometimes a refresh token) in the response back to the client.
-
The client can now use the access token to request access to the desired resource from the resource server.
CData Arc and OAuth 2.0
There are a handful of connectors within CData Arc that support OAuth 2.0 as an authorization mechanism. Many of these connectors are those that integrate with one of CData’s many data drivers, such as Salesforce or Shopify but this post focusses on the commonly used Email Send and Email Receive Connectors that also support the OAuth 2.0 protocol.
Email Send and Receive Connectors
In CData Arc, both the Email Send and Email Receive connector support OAuth 2.0 as an authentication mechanism. When selected, the connector settings will change to display the following fields necessary for configuration:
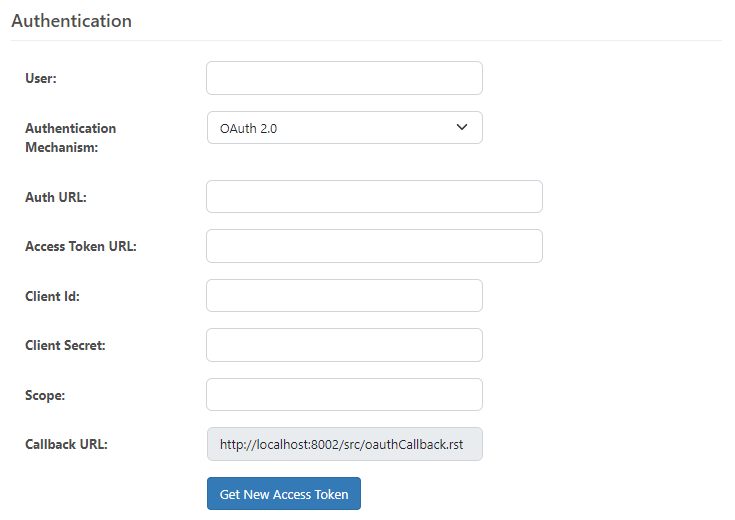
This configuration looks quite different than the previously mainstream mechanism of Basic Authentication, which simply required a username and a password. However, each one of the above fields is explained in more detail below.
Connector Settings
The User field is simply the email address of the account that you are wanting to use. If using Email Send, it would be the email that the connector will use to send emails from. If using Email Receive, it will be the email that the connector will receive emails from.
Auth URL, commonly called “Authorization URL” is going to be the URL that you get from the authorization server and serves as the destination of where the authorization request will be sent to.
The Access Token URL is typically similar in structure to the Auth URL, but is used to obtain the actual access token from the server.
The Client ID field is a unique public identifier that identifies you as the connecting client.
Client Secret is a sensitive string that is only know by the connecting client and the authorization server. This string should be kept in a secure place and should not be shared.
Scope is used to specify the exact resources and access that the connecting client is requesting.
The Callback URL (sometimes called Callback URI or Redirect URI) tells the authorization server where to redirect the client to after completing the request.
Once you have obtained these credentials and values from your authorization server, you can simply input them into the fields within the connector and then get a token to start sending or receiving emails.
Global Alert Email Settings
In addition to configuring OAuth 2.0 for the Email Send and Email Receive connectors, these same settings are also available when enabling email alerts at the application level. Under Settings → Alerts, Arc allows you to specify an email server that will be used to deliver global alert notifications (for example, when connectors encounter errors or important system events occur).
When OAuth 2.0 is selected as the authentication type for the alert email server, the same fields described above—such as Client ID, Client Secret, Authorization URL, and Token URL—must be provided. This ensures that Arc can authenticate securely with your mail provider before sending alert messages.
By aligning the configuration process for both connectors and global alerts, Arc provides a consistent approach to modern authentication across the platform. This makes it easier to maintain compliance with mail providers that have deprecated Basic Authentication, while also ensuring critical system alerts continue to reach administrators reliably.
Note on SMTP Server URLs:
Microsoft provides two different SMTP servers depending on the type of email account.
-
smtp.office365.comis used for Microsoft 365 (Exchange Online) business or school accounts. -
smtp-mail.outlook.comis used for personal Outlook.com/Hotmail.com accounts or older/legacy Outlook.com custom domain accounts.
If authentication fails on one, try the other—use of the correct server depends on whether the user’s mailbox is hosted in Microsoft 365 or on the Outlook.com (consumer) service. If you are not sure, please check with your mail server administrator.
Integration with Microsoft Outlook using OAuth 2.0
The setup of OAuth 2.0 for a mail server is going to be different across all mail servers, but Microsoft Outlook emerges as one of the the most popular. Microsoft has created their own documentation on how to enable OAuth 2.0 support for IMAP and SMTP connections to their mail server that can be found here.
The below section will cover a general overview of the Microsoft configuration and how that fits into the Email Connectors within CData Arc, but it is recommended that you follow the Microsoft documentation linked above for the configuration of OAuth 2.0 for your business.
Register with Azure AD
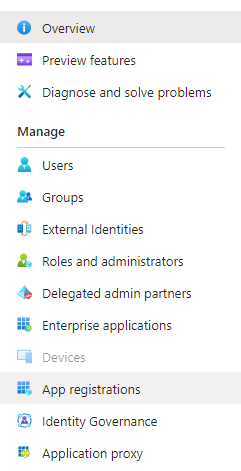
The first step (as mentioned within the Microsoft documentation) is to create and register an application with Azure Active Directory. Details on how to do this are provided by Microsoft, here. This involves creating a new app registration under “App registrations” within your instance of Azure Active Directory:
Once you have successfully created and registered your application, the next step will be to obtain the credentials mention above and create a client secret key for your application.
Acquire Credentials
Once you are inside the application that was created Azure AD, all necessary credentials can be obtained from the “Overview” tab on the left-hand column:

Client ID and Secret
Within the “Overview” section the Client ID for the application as well as a section for “client credentials” are shown. This client credentials section is where a client secret will need to be created for the application. The below image shows the page where Client ID and client credentials are shown (values redacted):

Once the client credentials section is clicked, a new page will open up that will list any current client secrets and allow users to create a new client secret.
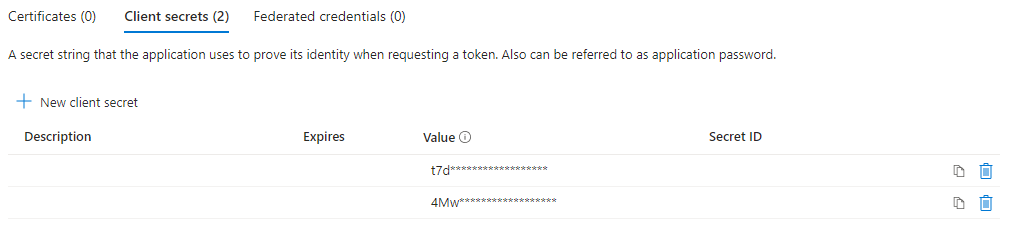
NOTE: Client secret values cannot be viewed, except for immediately after creation. Be sure to save the secret when created before leaving the page. Once the window where the secret key was created is closed, it will change to show as a masked value only.
Callback URL
While still within the “Overview” section, locate the “Redirect URIs” section. This is where you will need to enter the Callback URL that is shown within the settings tab of the connector you are configuring:
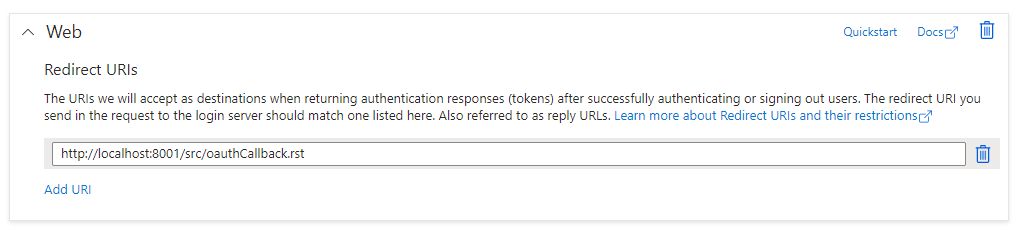
This is going to be the URL that Microsoft will redirect Arc to, after Arc makes an authorization request.
NOTE: It is important that the domain in the redirect/callback URL that is added to Azure is the URI that contains the domain in which the Arc users will be using to access the application. Otherwise, the redirect will not complete successfully. For example, if Arc is registered to a domain “mydomain”, the callback URL within Arc would be http://mydomain/src/oauthCallback.rst but if the localhost callback URL was added to Azure instead of the “mydomain” URL, callbacks would be unsuccessful unless the user was accessing Arc on a machine connected to the network where Arc is installed. If both localhost and domain URLs will be used to access Arc, it is recommended to include both Callback URLs within Azure.
Auth URL and Access Token URL
Staying in the “Overview” section, there is an “Endpoints” button at the top, as shown in the image at the top of this section. This Endpoints button will open a side panel within Azure to reveal a number of URLs associated with the application. The two that are needed within the Email Connectors are:
-
Azure AD OAuth 2.0 authorization endpoint (v2)
-
Azure AD OAuth 2.0 token endpoint (v2)
Scope
The scope parameter of an OAuth request is a way to limit the amount of access to resources that is given to a specific access token. Scope values help specify what resources the connecting client is looking to access.
There are often many possible scope values that can be used within an OAuth request, however for the purpose of this post and within the scope of OAuth for Microsoft, only the “offline_access” and “https://outlook.office365.com/IMAP.AccessAsUser.All” scope values will be discussed. These scope values are the minimum scopes required by Microsoft for Arc to be able to access the emails on the server and for automation to work successfully within the Email Connectors.
The “offline_access” scope, when used in OAuth requests to the Microsoft Authorization Server and added as an API permission within Azure, will allow the application to receive refresh tokens from the Microsoft identity platform token endpoint. Refresh tokens are long-lived tokens that act as a credential artifact that OAuth can use to get a new access token without user interaction. This means Arc can automatically get new access tokens as older ones expire, without making the user authenticate again. The Email Connectors will actually make this check under the hood at runtime and determine if a new access token is required, and if so, fetch the token via the refresh token.
The “https://outlook.office365.com/IMAP.AccessAsUser.All” scope value is required since it allows the app to have the same access to mailboxes as the signed-in user via IMAP protocol.
To configure these permissions within the Azure application, navigate to the ‘API permissions” tab of the “Manage” section within the app registration and then click “Add a permission” to add the necessary permissions (NOTE: Depending on your company setup, you may need more than the two permissions listed above)

More details about supported scopes and scope configuration for Microsoft mail servers can be found within the Microsoft documentation, here.
Performing a Test
Now that the necessary credentials and URLs have been obtained, it is time to perform a test within the connector. Ensure that all fields are filled out with the correct information and press the “Get New Access Token” button. A new browser tab will open and contain a Microsoft login prompt. Log in with the email address that is desired to be used within the connector.
If successful, a green banner will appear with “Success!” and the “Get New Access Token” button should change to say “Refresh Access Token”.
The final step in performing a test is to send or receive an email with the respective connector. If sending an email or receiving from the connected mailbox is successful, the connector has been setup successfully for OAuth 2.0.
NOTE: When redirected to the authentication window, you must authenticate with the same user/email address that was entered in the “User” field of the connector. Additionally, when using Email Send, the “From” address must be the same email that was used to authenticate.
Common Errors
IMAP Protocol error: 1 NO LOGIN failed.
This error is occurring during the test connection for an O365 mail server and is caused by the user having set the Authentication Mechanism to Basic. However, Microsoft has disabled support for Basic Auth for Exchange Online (O365) thus, this method is no longer supported when attempting to connect to O365 via a third party application such as Arc.
Set the Authentication Mechanism to OAuth 2.0 and enter the required credentials to resolve this error.
IMAP Protocol error: 2 BAD user is authenticated but not connected.
This error occurs when the connector has been configured with an email account that is part of the domain, but does not have permission to access the mail server via OAuth.
This can be reproduced by getting/refreshing a token with a valid email address, then entering a fake email and attempting to send/receive email messages.
IMAP protocol error. 1 NO AUTHENTICATE failed
This error commonly occurs when the scope values set within the connector and/or the scope values configured in Azure AD are incorrect. In our findings we have seen that the two key values that need to be included here are as follows:
offline_access https://outlook.office.com/IMAP.AccessAsUser.All
The offline_access scope, when used in OAuth requests to the Microsoft Authorization Server and added as an API permission within Azure, will allow the application to receive refresh tokens from the Microsoft identity platform token endpoint.
https://outlook.office.com/IMAP.AccessAsUser.All is outlook's resource URL allows the app to have the same access to mailboxes as the signed-in user via the IMAP protocol.
There are more scope settings that could be read from Microsoft official documentation at https://learn.microsoft.com/en-us/azure/active-directory/develop/scopes-oidc.
SMTP protocol error. 535 5.7.3 Authentication unsuccessful
This error occurs when the email account listed within the “User” field of the connector is NOT the same account that is being used to authenticate within the OAuth redirect window. The authenticated user and the user entered within the “User” field of the connector MUST be the same.
This error can also occur when using the incorrect SMTP server for your Microsoft email backend. In the context of Microsoft, there are actually two different SMTP server URLs and depending on how your system is configured will determine which one you need to use.
-
smtp.office365.comis used for Microsoft 365 (Exchange Online) business or school accounts. -
smtp-mail.outlook.comis used for personal Outlook.com/Hotmail.com accounts or older/legacy Outlook.com custom domain accounts.
If authentication fails on one, try the other—use of the correct server depends on whether the user’s mailbox is hosted in Microsoft 365 or on the Outlook.com (consumer) service.