CData provides comprehensive connectivity to your Workday data. If you're just getting started, you can read our Knowledge Base article on connecting to the robust Workday Query Language (WQL) and Reports-as-a-Service (RaaS) APIs available for Workday.
This article serves as a guide for making the most of your CData & Workday integration once you've enabled the required services. The practices outlined below come from collaboration between CData's and Workday's engineering teams and are designed to help reduce the load on your Workday instance, reduce the load and cost on your own systems, and facilitate more efficient analysis and reporting on your Workday data.
Using the Workday Prism Data Catalog
Our top recommendation is for users to create tables and datasets in the Data Catalog (in Prism Analytics) whenever possible. Workday Prism Analytics acts as a data hub built into Workday, making Workday easier to analyze and report on without compromising the security and fidelity of the Workday system. CData's connectivity solutions can access the datasets and tables created in the Data Catalog, allowing you to work with your Workday data in your preferred BI, analytics, and data tools. And thanks to user-based permissions, your stakeholders will only have access to the same data they have permissions for in Workday.
To analyze Workday datasets and tables published from the Data Catalog in external tools and applications, follow these basic steps:
1. Open Data Catalog
Log into your Workday instance and open the Prism Data Catalog (search for Data Catalog).
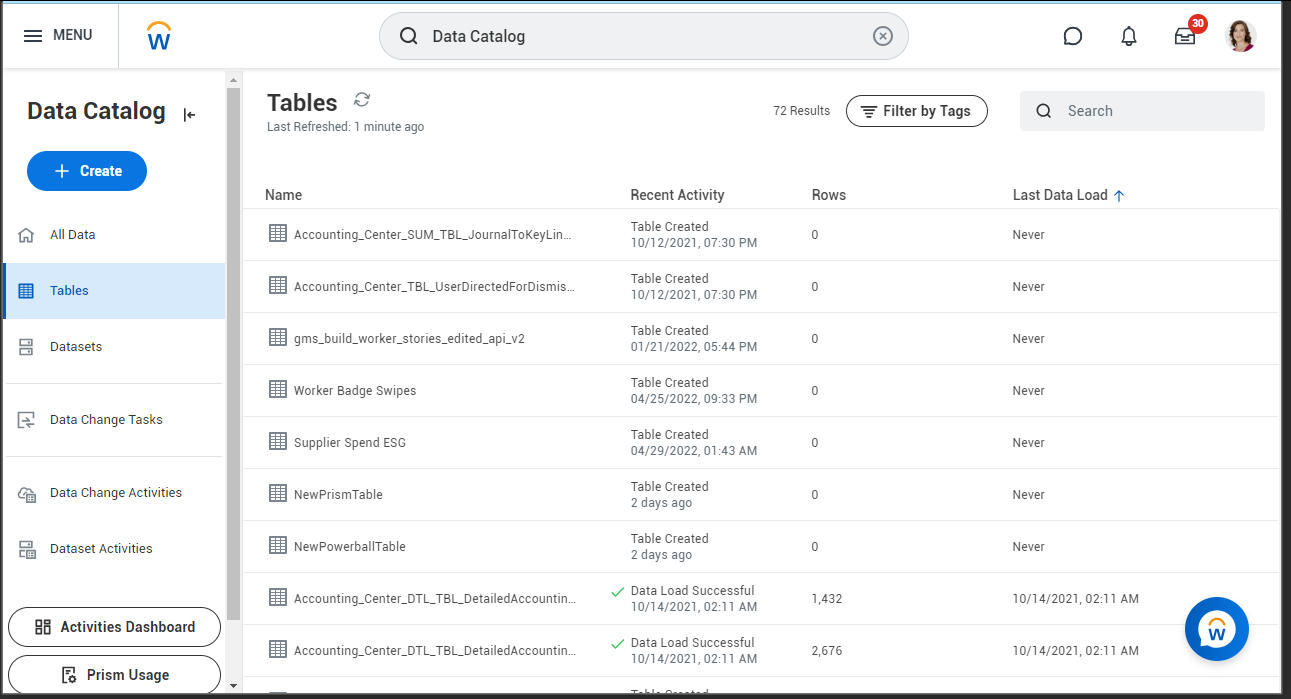
2. Create a new table or dataset
In the Data Catalog click "+ Create" to create a new table or dataset.
- Name the table and click "Enable for Analysis"
- Click Create
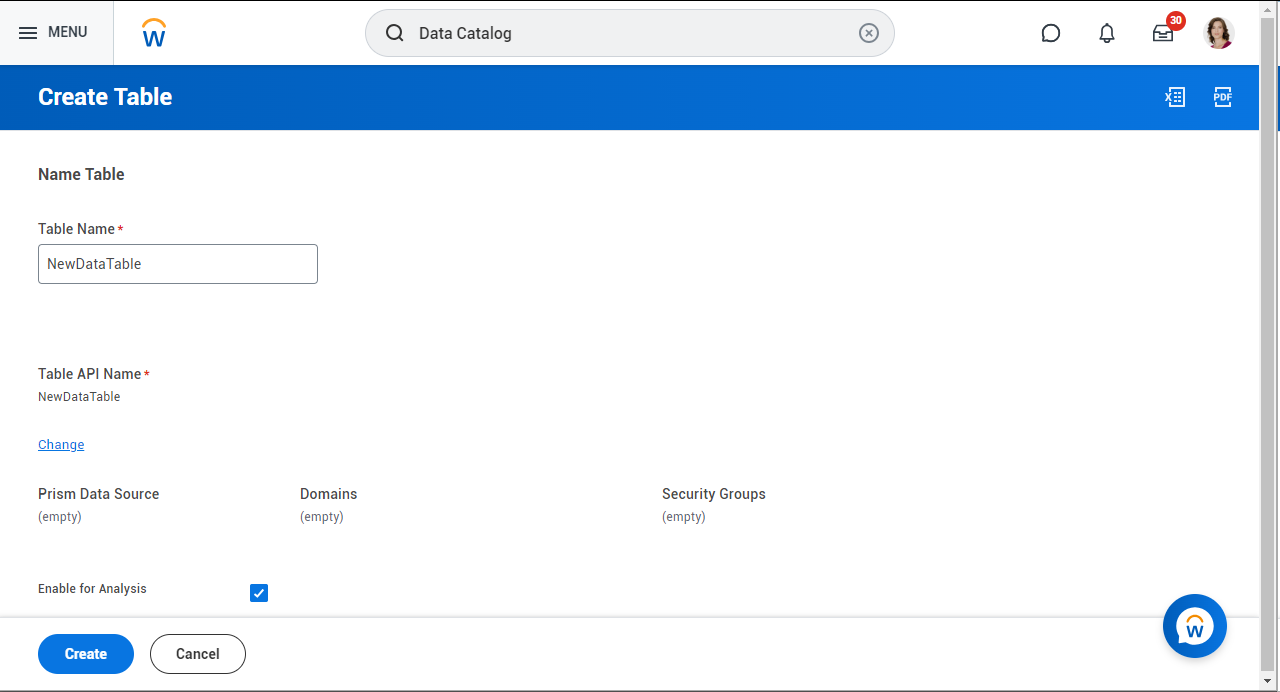
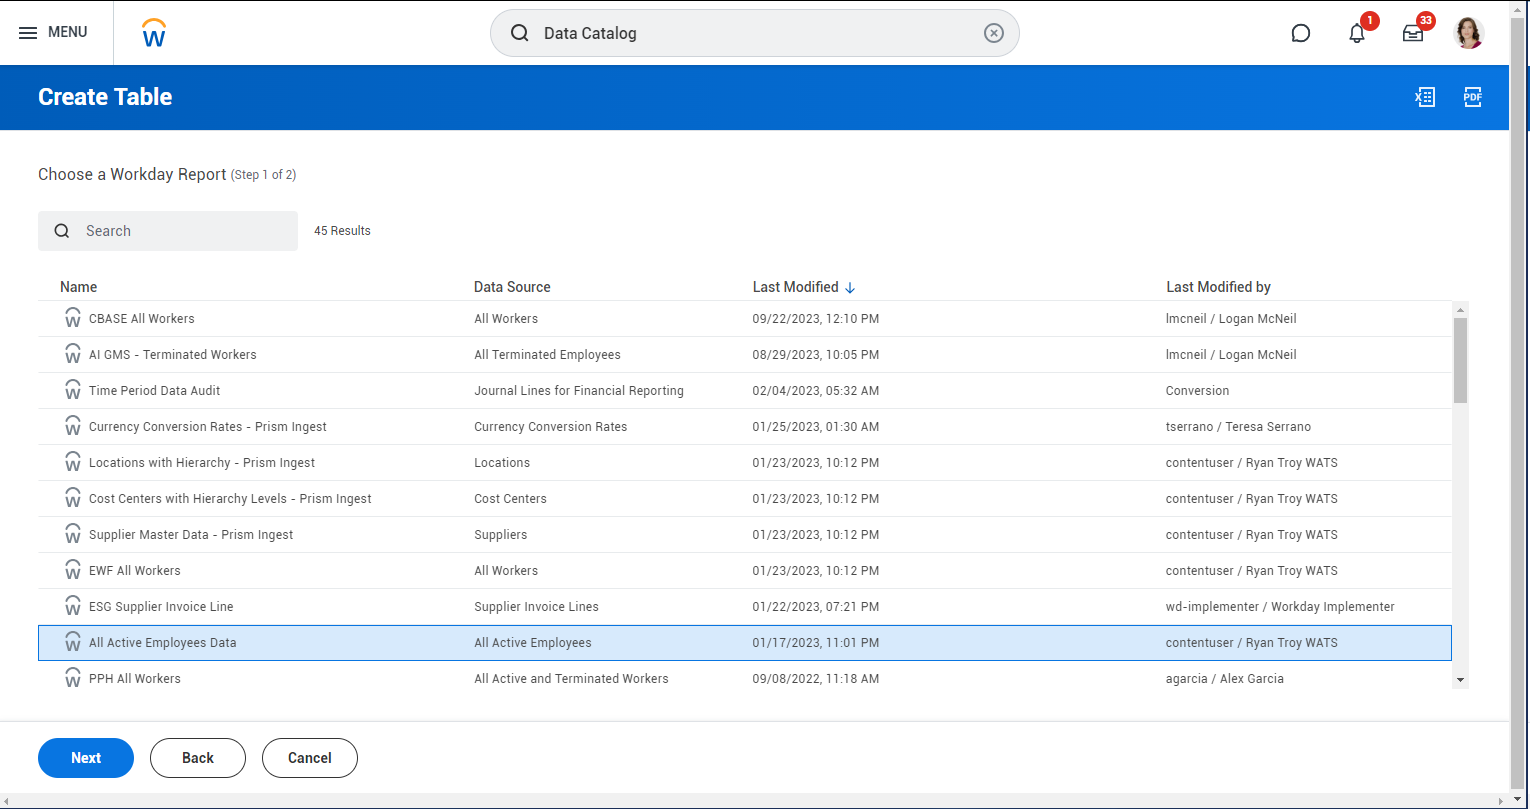
- Choose the source for the new table or dataset
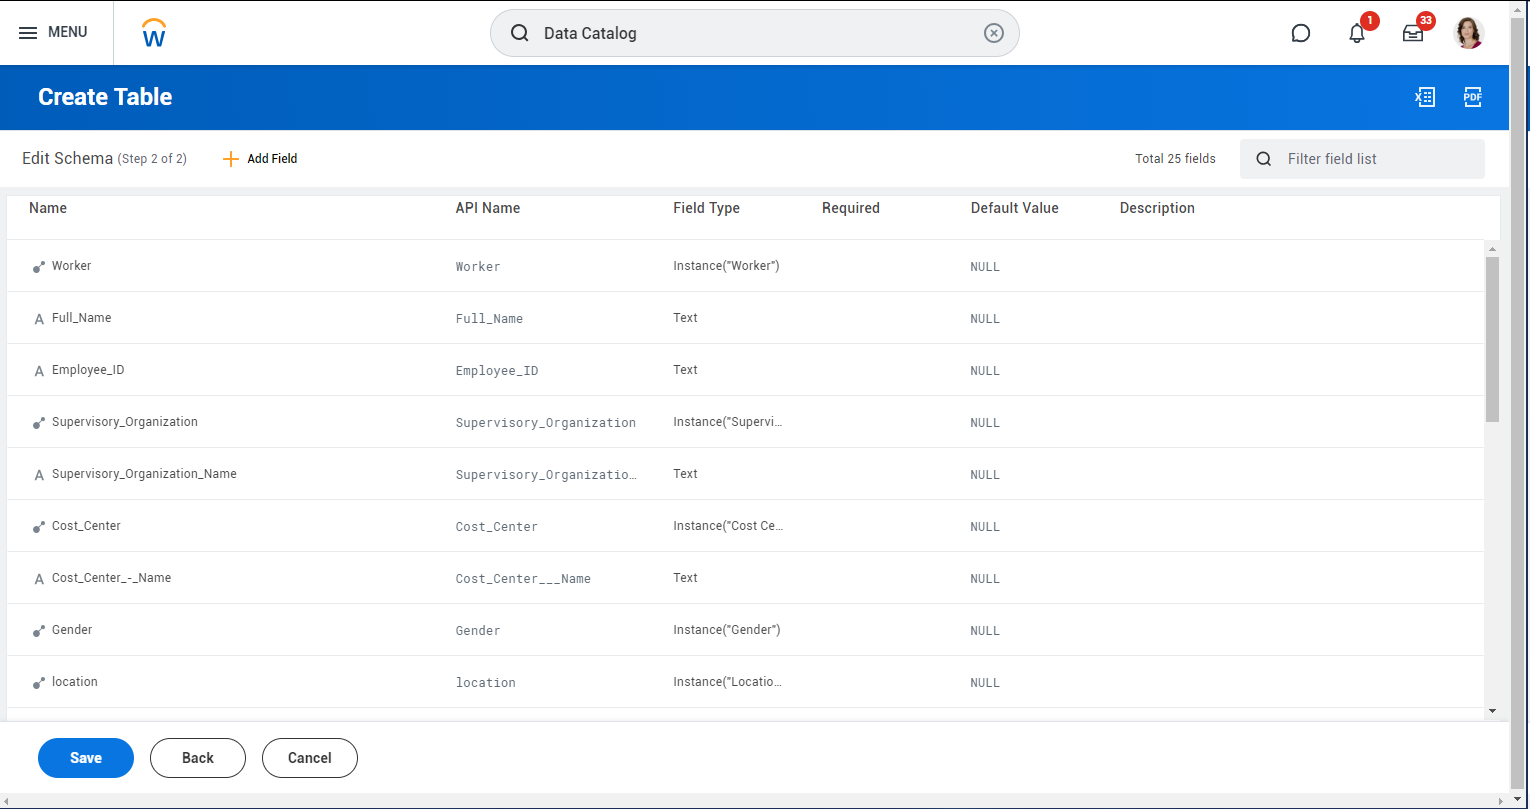
- Edit the schema as needed and click Save.
3. Create the Data Change Task
Once you create the new table or dataset, create the data change task to ensure the new entity is regularly populated with data (and is visible through CData Connectors).
- Either click "Create Data Change Task" from the new table/dataset wizard or click the option for an existing table/dataset
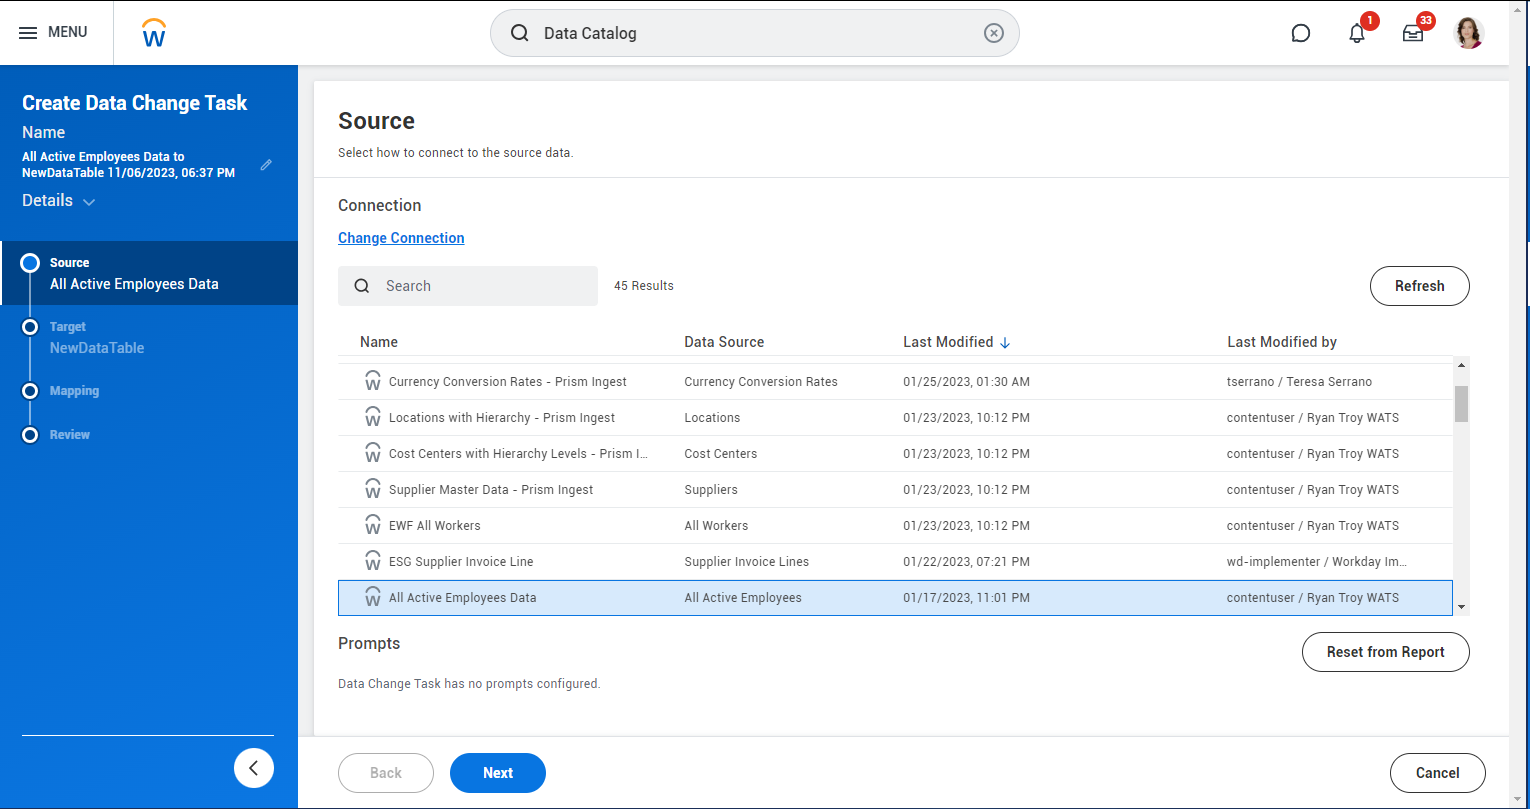
- On the Source page, click "Change Connection" to choose the source
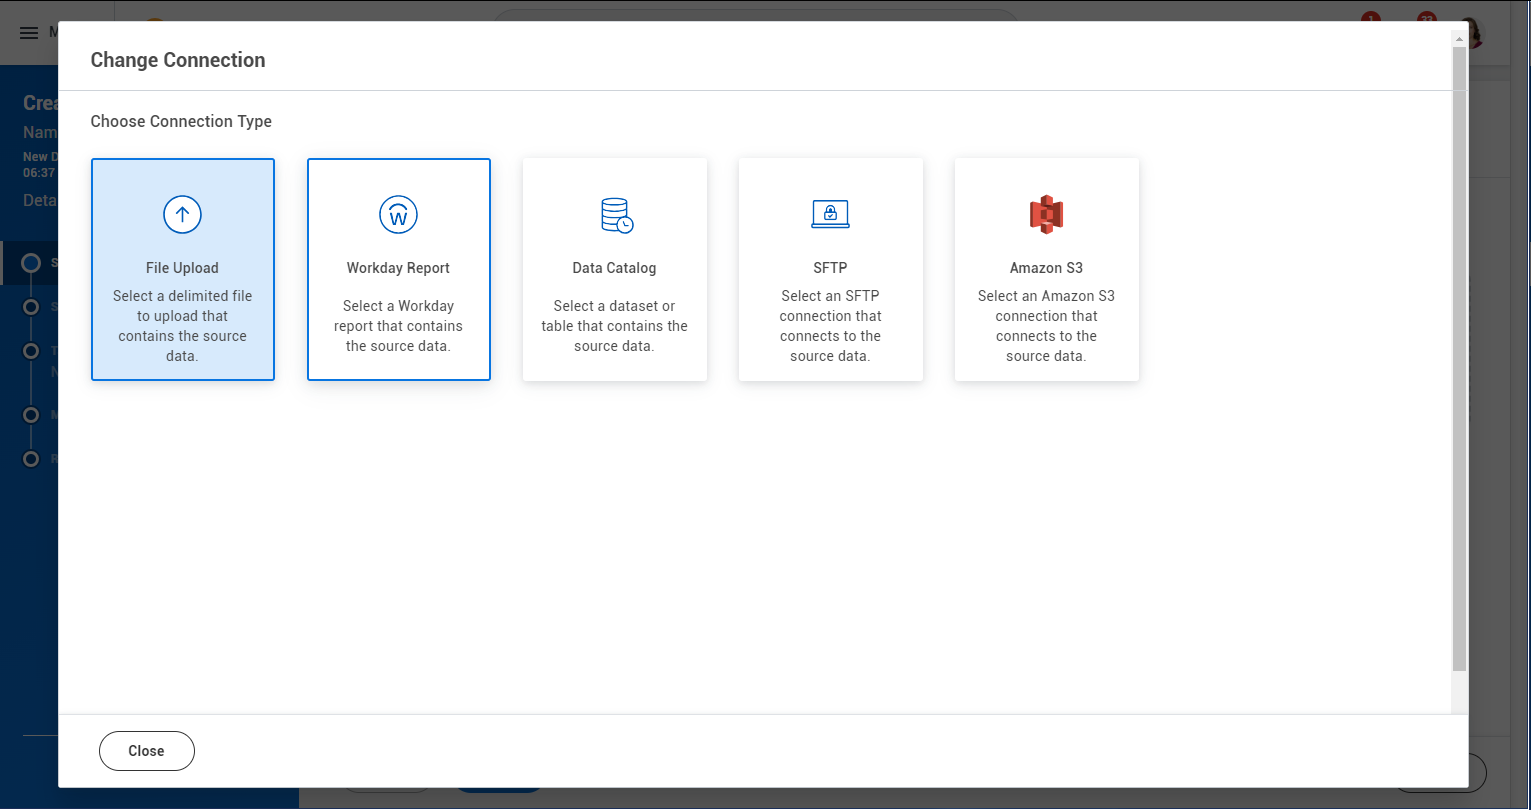
- Apply values for any prompts and click "Next"
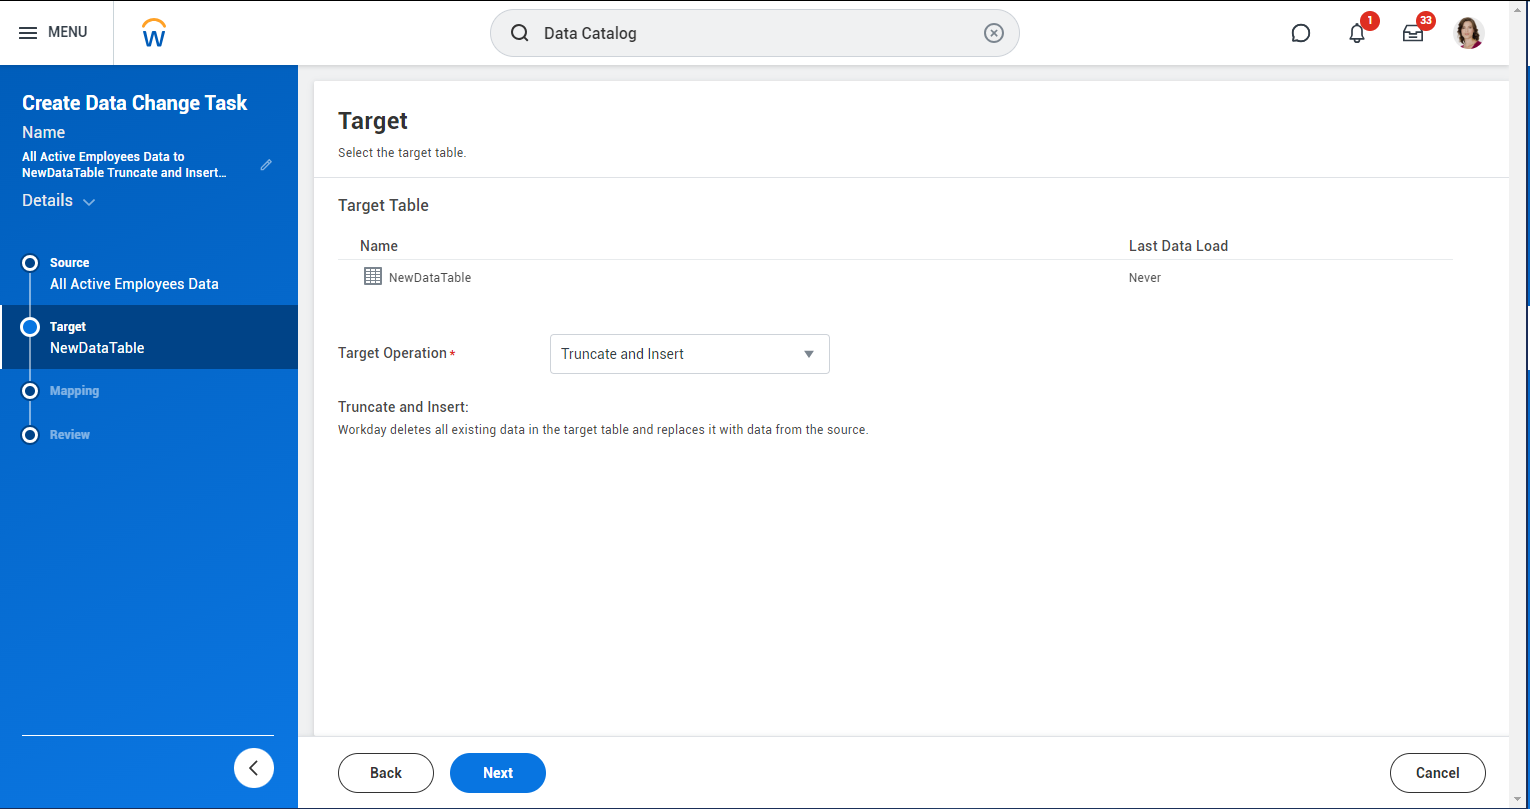
- Select the Target Operation and click "Next"
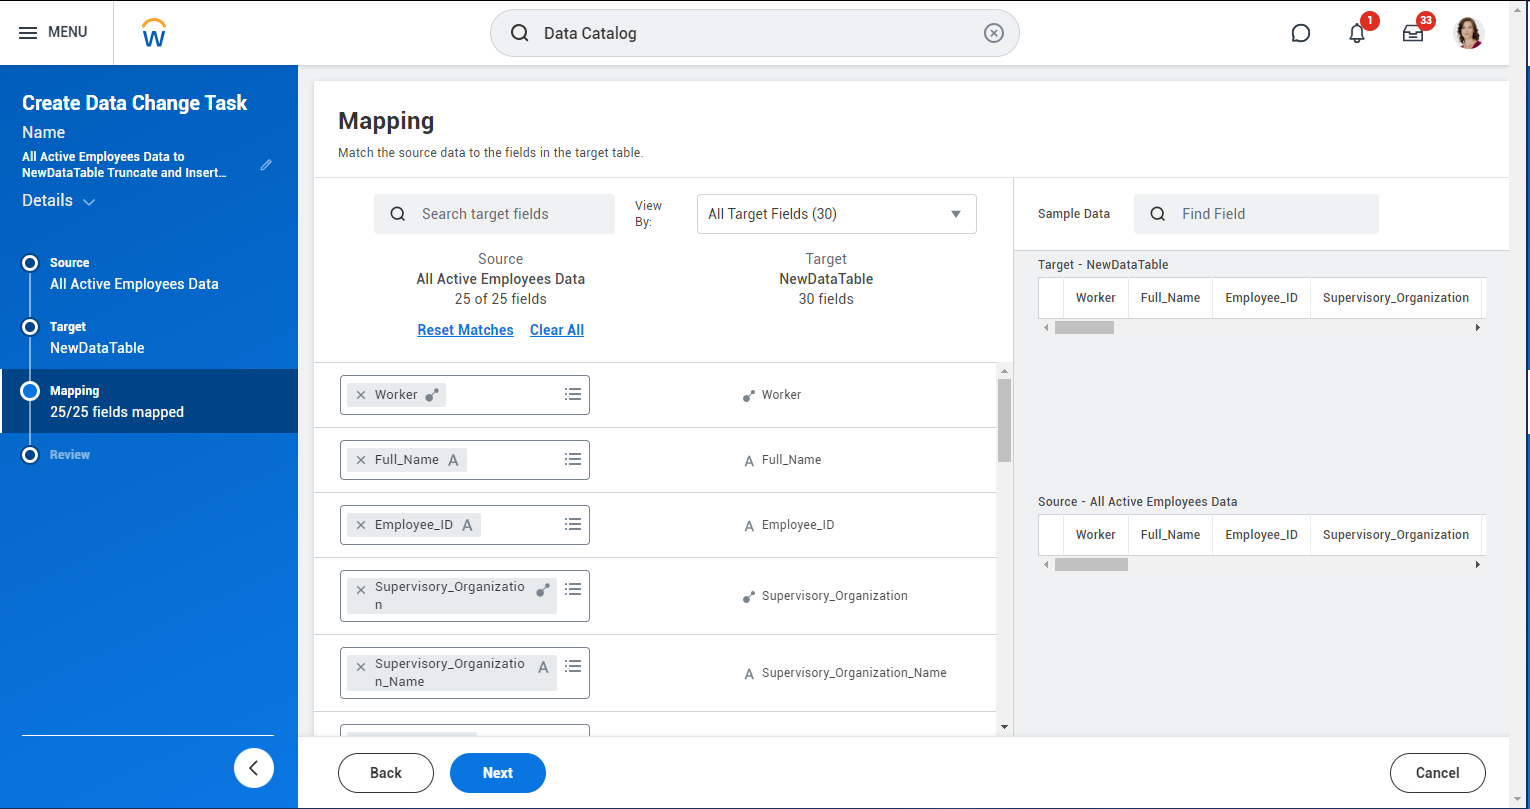
- Edit the column (field) mapping and click "Next"
- Review the settings and click "Finish" > "Save and Run Now"
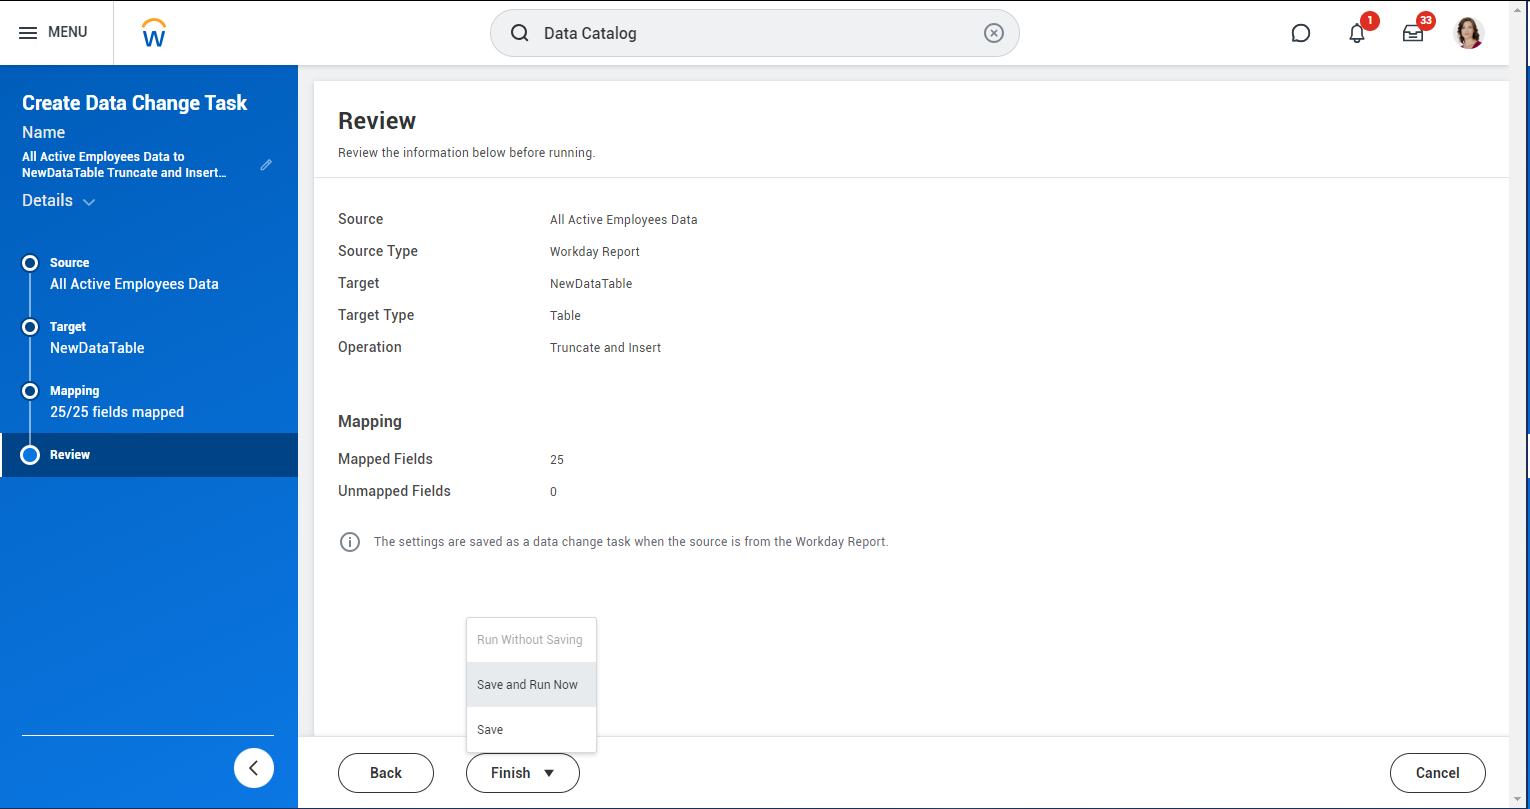
Once the data change activity completes, you will be able to view your new dataset in your preferred tools and applications through CData's connectivity solutions.
4. View the table/dataset
To view, analyze, or otherwise work with the new table/dataset, connect to your Workday instance with your CData connector. When prompted to select a "table" search for your table/dataset name prepended by "cds_" (e.g. "cds_newDataTable").
Using Workday Reports-as-a-Service (RaaS)
If you aren't using the Prism Data Catalog, you can use Workday's RaaS API to work with the data bound to Workday reports. To read reports exposed the through the Workday RaaS, set the Connection Type property to "WQL" in the CData solution and create a custom report to use this feature.
Creating a Custom Report for RaaS
- In Workday, open the Create Custom Report task.
- Name the report Reports as a Service.
- Enter Advanced for the report type.
- Select Enable As Web Service.
- Clear Optimized for Performance.
- Enter All Custom Reports for the Data Source.
After the report is created, configure the report by adding columns and filters:
- Add 4 Columns: Fields, add Report Name, Web Service Namespace, Report Owner, and Brief Description.
- Set "Business Object" to Custom Report (select Primary Business Object, Custom Report)
- Open the Filter tab and create 2 filters, using the And condition:
- Enter "Web Service Namespace" as the field and "is not blank" as the operator.
- Enter "Current User" as the field, "in the selection list" as the operator, "Value from Another Field" as the comparison type, and "Authorized User" as the comparison value.
- Click "OK" to save the report and click to dismiss any warnings.
The final step to accessing Reports as a Service is finding the URL associated with the report. This URL is used for the CustomReportURL connection property in your CData connectivity solution.
- Open the newly created report.
- Click the ellipsis (...) button beside the report title.
- Find the Web Services tab within the pop-up.
- Hover over the Web Services tab and select "View URLs."
- Right-click and copy the Workday XML URL.
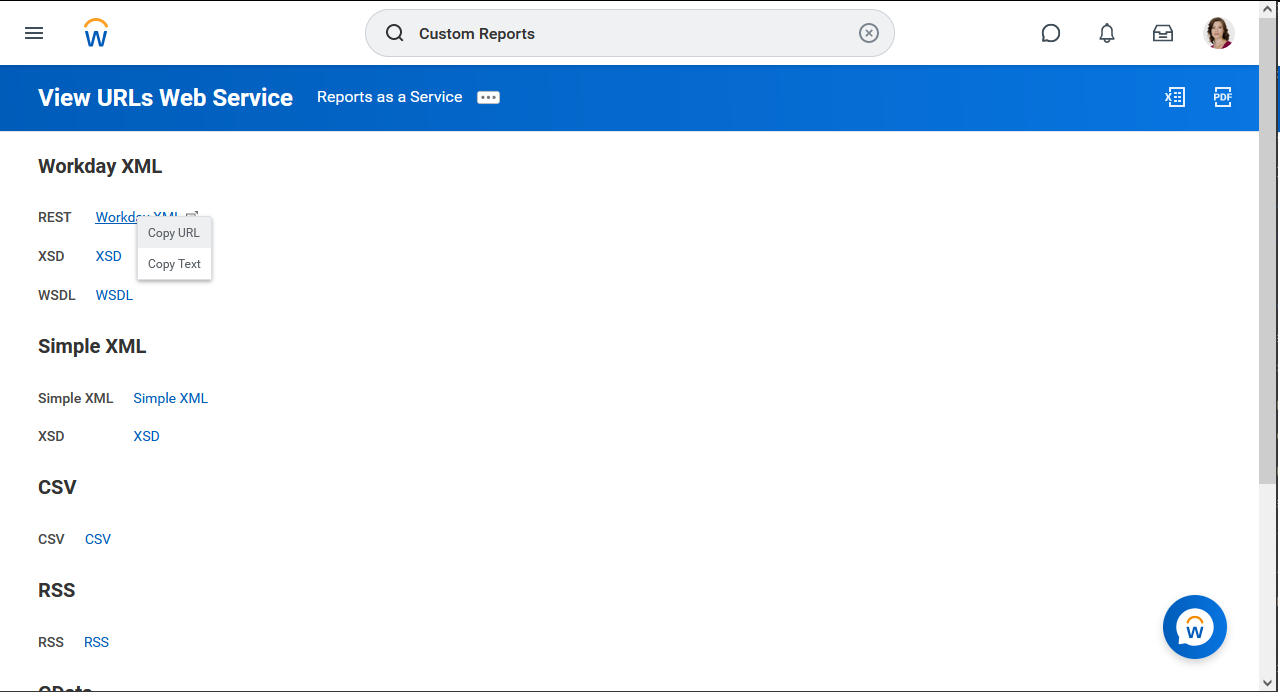
At this point, you will be able to read data from any Custom Reports created in Workday in your preferred data tools.
Using Workday base datasets
If you're not using the data catalog to publish tables and datasets or Workday's RaaS, then you'll need to use the Workday base datasets. These datasets tend to be more esoteric and often require prompts to limit results to improve performance and usability. You also need a certain level of understanding Workday's query language (WQL) and SQL (the language used by CData's connenctivity solutions). Be sure to set the Connection Type connection property in your CData connection to "WQL."
Using prompts to refine results
The entities available from WQL are often large models and require prompts to retrieve data. Prompts are fields that allow you to refine the results of a data request. If you've ever exported data from Workday, you've seen these prompts in the form(s) you use to download the data. To see the prompts for a given entity, use a SQL query tool (like the Data Explorer in Connect Cloud or DbVisualizer) to query the "sys_tablecolumns" view. For example:
SELECT
   *
FROM
   sys_tablecolumns
WHERE
   TableName = 'journalLines' AND
   ColumnName LIKE '%prompt%';
NOTE: These prompts my not match what is seen in the API.
One you know the available prompts, you can query the related tables to retrieve the appropriate values (typically an "id" field) for subsequent prompts. The sequences of queries below drill down into the values of the journal lines for a specific company, year, and journal status.
Learning the names of the prompts for a given table
SELECT
   *
FROM
   sys_tablecolumns
WHERE
   TableName = 'journalLines' AND
   ColumnName LIKE '%prompt%';
Finding the prompt value for a specific company
SELECT
   [workdayId],
   [company.descriptor]
FROM
   Companies
WHERE
   [company.descriptor] =  'Global Modern Services, Inc. (USA)'
Finding the prompt values for journal status, year, and period
SELECT
   [company.descriptor],
   [company.id],
   [journalStatus.id],
   [journalStatus.descriptor],
   [fiscalYear.id],
   [fiscalYearNumber],
   [period.id]
FROM
   journals
WHERE
   company_Prompt = 'cb550da820584750aae8f807882fa79a' AND
   accountingDateOnOrAfter_Prompt = '1/1/2017' AND
   accountingDateOnOrBefore_Prompt = '3/1/2017'
LIMIT 10
Finding the values for journal lines
SELECT
   workdayID,
   lastFunctionallyUpdated,
   accountingDate,
   [absoluteDebitOrCreditAmount.currency],
   [absoluteDebitOrCreditAmount.value]
FROM
   journalLines
WHERE
   company_Prompt = 'cb550da820584750aae8f807882fa79a' AND
   year_Prompt = '2f54eb1728bf102c30f35c40194d0344' AND
   journalEntryStatus_Prompt = '6f8e52d2376e4c899463020db034c87c' AND
   entryMomentFrom_Prompt = '1/1/2017' AND
   entryMomentTo_Prompt = '6/1/2017'
LIMIT 10
Using raw SQL/WQL
You can leverage your knowledge of WQL to query specific parts of an entity without requesting all the fields or rows. For example, the allActiveEmployees entity has 4842 fields, which is a lot of information to get through. If your IT team knows the WQL data model well, they can use Derived Views in Connect Cloud or User Defined Views in our other connectors to create a view of a specific entity based on a SQL/WQL query. The query below requests specific information from the allActiveEmployees entity, using drill-down techniques (e.g. gender.descriptor) and CData-native SQL functions (e.g. JSON_EXTRACT) to create a specific view of employee data that can easily be analyzed and reported on.
SELECT
  dateOfBirth,
  JSON_EXTRACT(assignedOrganization,'$[0].descriptor') AS department,
  [gender.descriptor] AS gender,
  hireDate,
  workdayID,
  jobTitle,
  [locationAddress_StateUnitedStates.descriptor] AS location_state,
  [raceEthnicity.descriptor] AS race
FROM
  [REST].[allActiveEmployees]
More information & free trial
The tips above will help you get the most of our CData connections to Workday, improving performance and following the integration recommendations of Workday experts. To get more information about working with your Workday data through CData's connectivity solutions, check out our Workday integration page. Sign up for a free trial of Connect Cloud or download a trial of any of our drivers or connectors to get started with easier access to your Workday data today!


