The CData Sync App provides a straightforward way to pipeline REST data to any supported destinations through the Rest provider. Our Rest provider does expose different methods of authentication, to ‘hide’ the complexity of connecting and accessing data.
However, considering the number of APIs and therefore the enormous variety of authentication methods, there is always need for a ‘new method’ to be supported.
Here comes in handy our REST provider; a development tool that allows us to write custom script files to easily connect to any REST service.
In this article, we will provide a detailed, step-by-step explanation of how we can establish a connection through ‘Custom Authentication’ methods and be able to replicate tables.
Please note that to simplify the instructions and make them easier to follow, the following steps will show how to connect to a specific REST API called Centric 8, and replicate the ‘Styles’ table, always referring to its API documentation.
1. Authenticating to C8 server
Before we can access any REST endpoints, we have to get authenticated in C8 server as a valid user by using the Session endpoint. To do so we have to issue the username and password through the HTTP request Body either in JSON or XML formatted data as shown below:
POST http://{c8server}/csi-requesthandler/api/{version}/session HTTP/1.1
{
"username":"user_test1",
"password":"***"
}
On success, the Session API returns a new C8 session and authentication token in the HTTP body as JSON or XML (as per your choice).
Example in JSON:
{ "token": "SecurityTokenURL=centric://_CS_SecurityToken/**********" }
When we create a new REST connection in SYNC and specify the following connection properties:
> Connection Name = < a connection name >
> URI = <the URI for the resource location; http://{c8server}/csi-requesthandler/api/{version}/styles in our example>
> Auth Scheme = None
> User & Password = <our username and password>
> Location = < A path to the directory that will contain the schema files defining tables, views, and stored procedures>
> Generate Schema Files = OnStart <By configuring this a file will be generated at connection time for any tables that do not currently have a schema file. You can refer to this section of our documentation for more information. >
Once we hit the “Save & Test” button, an error will be thrown, indicating that the authentication process has failed, and the connection is not saved. This happens because based on the specified properties our REST provider ‘thinks’ that we are actually using a Basic authentication method and not a Custom OAuth, issuing an incorrect request.
To overcome this, we have to create a sys_connect.rsd file and save it to the path specified on the Location property.
By doing so each time we call TestConnection from the Sync UI or when run a task/job (in the background, before asking for data Sync tests the connection), the provider will make use of this file, issuing the correct response.
To create this file, open a text editor such as Notepad++, notepad, etc and copy the following script:
<api:script xmlns:api="http://apiscript.com/ns?v1" xmlns:xs="http://www.cdata.com/ns/rsbscript/2" xmlns:other="http://apiscript.com/other?v1">
<api:info title="sys_connect" desc="This is a system table that allows you to test a connection.">
</api:info>
<!-- Creating attributes and giving them values -->
<api:set attr="tokenURI" value=" http://{c8server}/csi-requesthandler/api/{version}/session " />
<!-- User and password in this case are read from the connection properties configured in the Rest provider. In case they are black an error will be thrown. -->
<api:validate attr="_connection.user" desc="User must be provided in the connection to query this table." />
<api:validate attr="_connection.password" desc="Password must be provided in the connection to query this table." />
<!-- Initiating authentication call, respecting the required format -->
<api:set attr="token.URI" value="[tokenURI]" />
<api:set attr="token.method" value="POST" />
<api:set attr="token.ContentType" value="application/json" />
<api:set attr="token.cachecontrol" value="no-cache" />
<api:set attr="token.EncodePostData" value="false"/>
<api:set attr="token.data">{
"username":"[_connection.user]",
"password":"[_connection.password]"
} </api:set>
<!-- Reading the security token returned in response -->
<api:set attr="token.ElementMapPath#1" value="/json/token" />
<api:set attr="token.ElementMapName#1" value="token" />
<api:call op="jsonproviderGet" in="token" out="tok">
<api:set attr="token.Token" value="[tok.token]" />
</api:call>
</api:script>
2. Saving the security token
To access other endpoints, we have to pass the authentication token via the HTTP header in every subsequent REST call. To accelerate this process, we are going to save the returned token on a file, named ‘tokenValue’ in this example.
Adding the following in the sys_connect.rsd file does that:
<!-- Store new token in tokenValue file -->
<api:set attr="write.data" value="[token.Token]" />
<api:call op="fileWrite?file=tokenValue" in="write" />
Please note that the path set in the Location property should be a folder path to which the Sync application has read and write access, in order to be able to write and read token from the file.
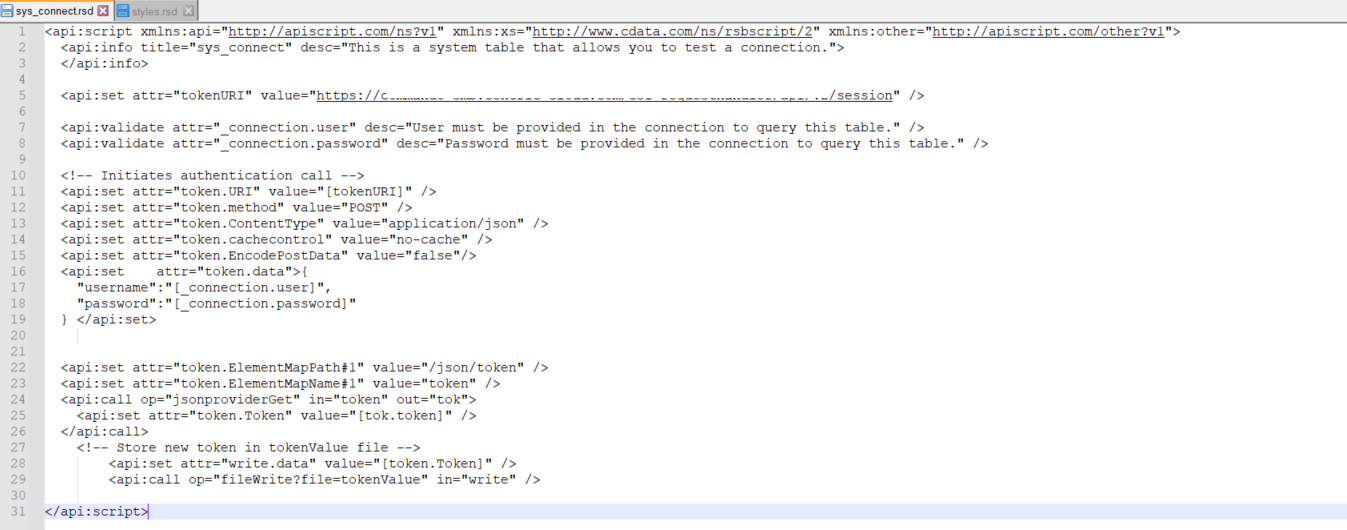
At the end, our schema file should look as in the following screenshot:

After saving the file, we are now able to successfully test and save the connection.
Note: This procedure uses the connection properties configured in the beginning to overwrite the tokenValue file each time the connection is tested.
3. Replicating ‘Styles’ table
Once the connection is saved, we will see that in the Location path, a new .rsd file is created.
(It is initially named JSONData.rsd, but I would recommend renaming it based on the endpoint you are going to connect to. For instance, I have renamed it to styles.rsd.)
This schema file, which contains information for the /styles endpoint, is autogenerated based on the configurations we have previously made to GenerateSchemaFiles and URI connection properties.
To get data from this endpoint, as mentioned above, we have to send the security token as a cookie header:
GET http://{c8server}/csi-requesthandler/api/{version}/styles HTTP/1.1
cookie: SecurityTokenURL=centric://_CS_SecurityToken/TEST_TOKEN
This can be achieved by editing the schema file (by opening it with a text editor such as notepad++, notepad etc.) and changing the script to read the token from the ‘tokenValue’ folder and sending it as a parameter:
<api:set attr="URI" value="https://commando-smb.centric-cloud.com/csi-requesthandler/api/v2/styles" />
<api:validate attr="_connection.OAuthSettingsLocation" desc="OAuth Settings Location" />
<!-- The GET method corresponds to SELECT. Here you can override the default processing of the SELECT statement. The results of processing are pushed to the schema's output. See SELECT Execution for more information. -->
<!-- reading the token from file -->
<api:set attr="void" />
<api:call op="fileRead?file=tokenValue" >
<api:set attr="accessToken.Token" value="[file:data]" />
</api:call>
<!-- using token as a cookie for the request sent in styles enpoint-->
<api:script method="GET">
<api:set attr="method" value="GET"/>
<api:set attr="URI" value="[URI]" />
<api:set attr="contenttype" value="application/json" />
<api:set attr="Header:Name#" value="cookie" />
<api:set attr="Header:Value#" value="[accessToken.Token]" />
<api:call op="jsonproviderGet" out="result">
<api:push item="result"/>
</api:call>
</api:script>
</api:script>
At the end, the schema file should look like this:

And the Location path like this:

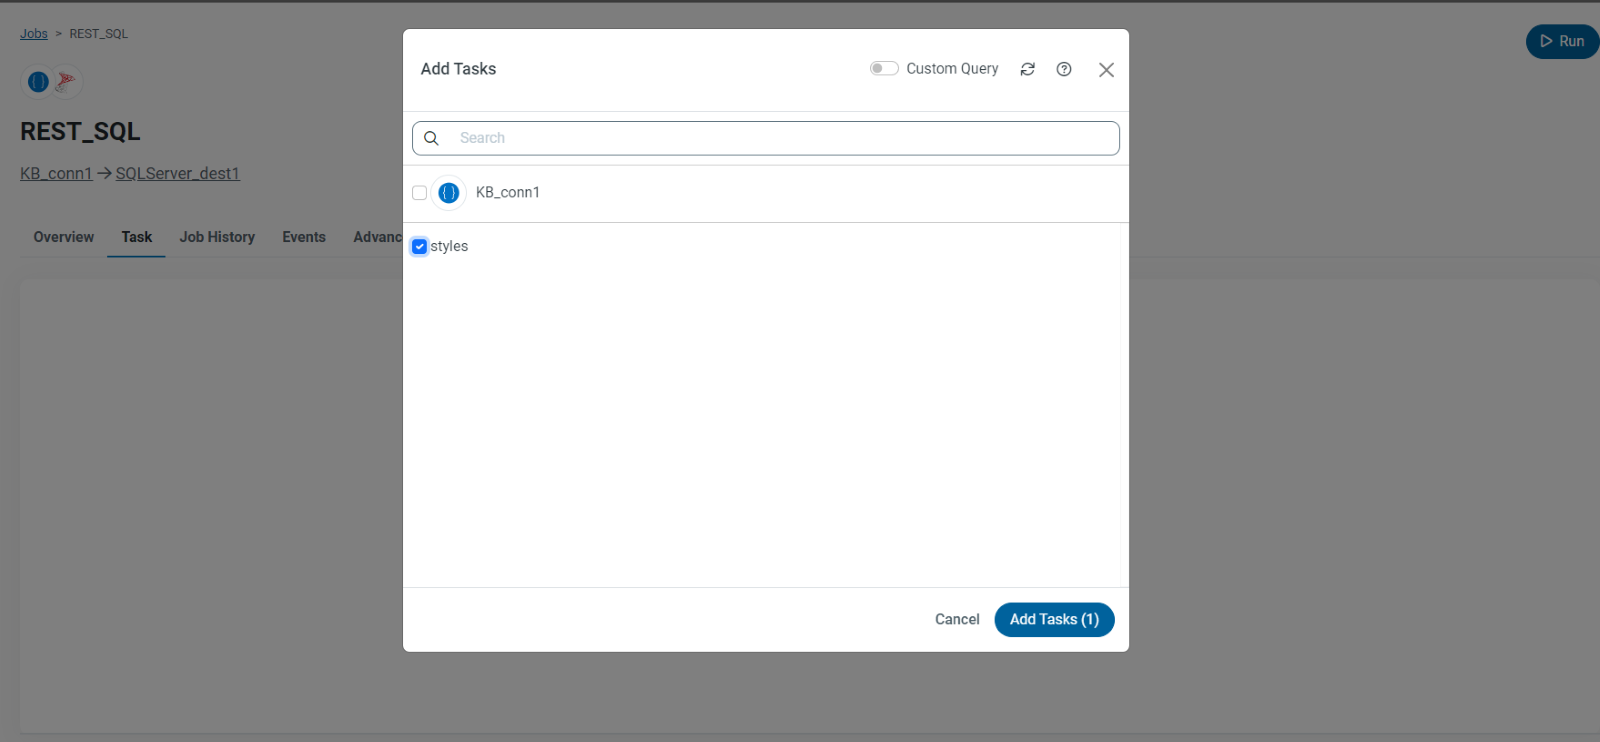
When creating a job and adding a new task, the configured .rsd file should be listed to the tasks list:

Note: After generating all the needed .rsd files I would recommend removing the URI set in the connection properties.
Please reach out to [email protected] if you run into any issues with a similar scenario.


