Using the CData JDBC Driver for Salesforce in AWS Glue, you can easily create ETL jobs for Salesforce data, whether writing the data to an S3 bucket or loading it into any other AWS data store.
In this article, we walk through uploading the CData JDBC Driver for Salesforce into an Amazon S3 bucket, the necessary IAM Role permissions, storing the connection properties in AWS Secrets Manager, creating a custom connector and creating a connection for that connector.
Step 1: Upload the CData JDBC Driver for Salesforce to an Amazon S3 Bucket.
To work with the CData JDBC Driver for Salesforce in AWS Glue, follow these steps to upload it (and any relevant license files) to an Amazon S3 bucket:
-
Open the Amazon S3 Console.
-
Select an existing bucket (or create a new one).
-
Click Upload
-
Select the JAR file (cdata.jdbc.salesforce .jar) found in the lib directory in the installation location for the driver.
Step 2: IAM Role
You should create a new role or update permissions to an existing role. The permissions that should be granted are:
-
AWSGlueServiceRole (For accessing Glue Studio and Glue Jobs)
-
AmazonEC2ContainerRegistryReadOnly (For accessing the CData AWS Glue Connector for SAP Concur)
-
AmazonS3FullAccess (For reading from and writing to Amazon S3)
-
AWS Secrets Manager
Step 3: Store Salesforce Connection Properties Credentials in AWS Secrets Manager
To safely store and use your connection properties, you can save them in AWS Secrets Manager.
-
Navigate to Secrets Manager.
-
Click Store a new secret.
-
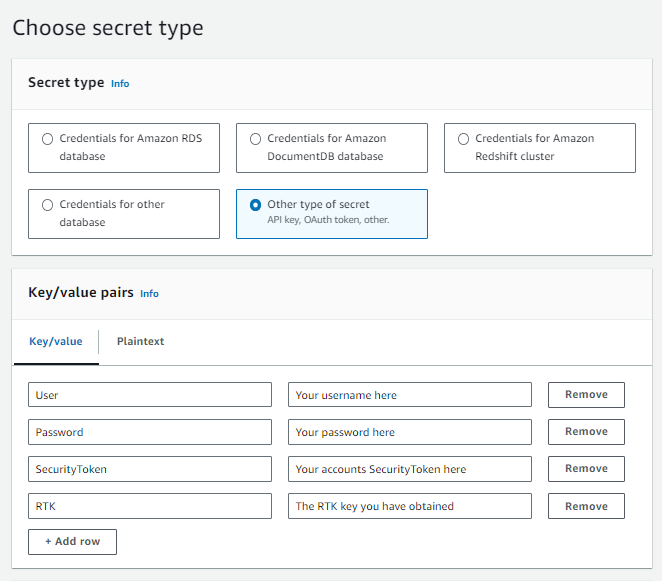
On the Store a new secret page, choose Other type of secret. This option means you must supply the structure and details of your secret.
-
You can read more about the required properties to connect to Salesforce in our documentation. Once you know which properties you wish to store, create a key-value pair for each property. For example in this case we are using basic authentication :
-
User
-
Password
-
SecurityToken
-
RTK
-
Click Next and set an unique name for you SecretsManager (e.g. SalesforceSecret).

-
Click Next then Store and the new secrets manager should be created.
Step 4: Create the custom connector.
Now, let's create the custom connector that uses the uploaded driver:
-
Navigate to AWS Glue Studio.
-
Click Connections.
-
Click Create custom connector.
-
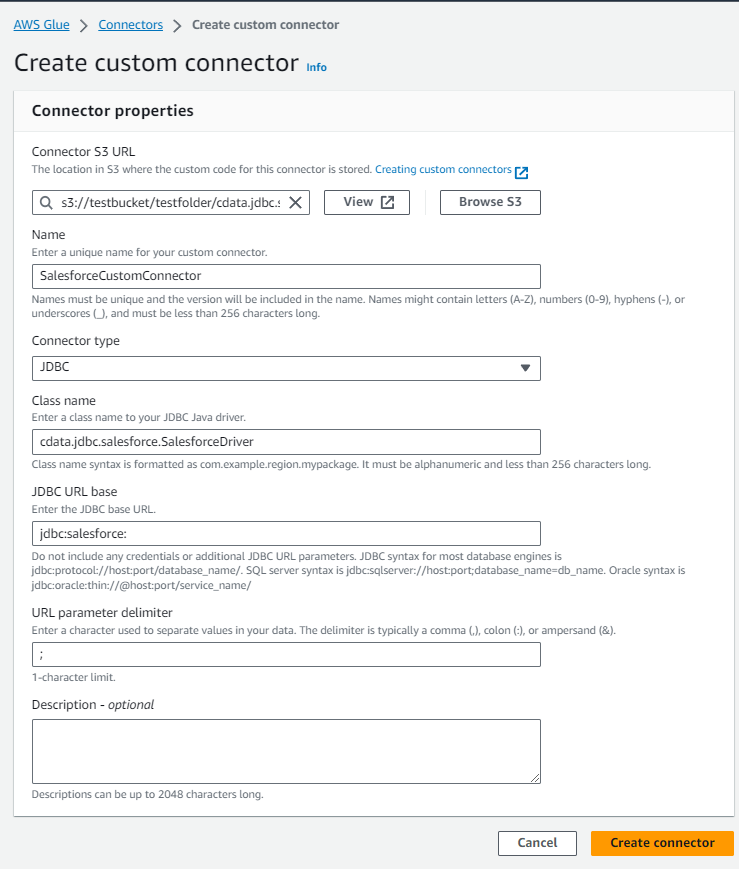
Make the following configurations:
-
Connector S3 URL: fill in or browse to the S3 bucket where you uploaded the JAR file. Be sure to include the name of the JAR file itself in the path, i.e.: s3://testbucket/testfolder/cdata.jdbc.salesforce.jar
-
Name: Fill in an unique name for the job, for example: SalesforceCustomConnector.
-
Connector type: Select JDBC.
-
Class name: Provide the driver class: cdata.jdbc.salesforce.SalesforceDriver.
-
JDBC URL base: Enter the JDBC base URL: “jdbc:salesforce:”.
-
URL parameter delimiter: Enter a character used to separate the parameters in your connection string: “;”.
Step 5: Create the connection.
To set up the connection for use in your AWS Glue Jobs, follow these steps:
-
Navigate to AWS Glue Studio.
-
Click Connections.
-
Click on the custom connector that you created earlier.

-
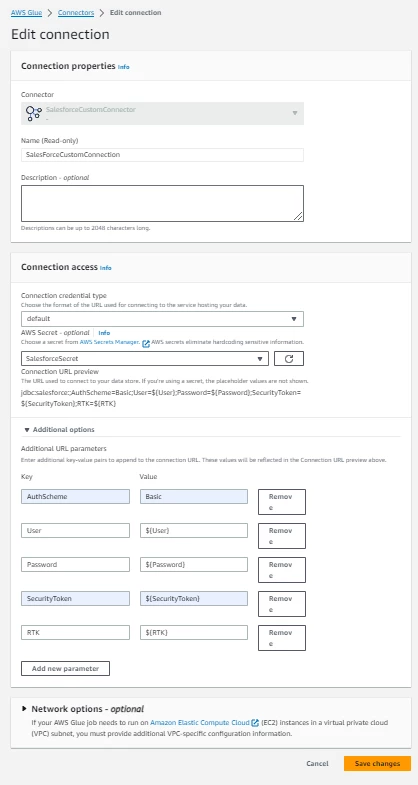
Make the following configurations:
-
Name: Enter a unique name for your connection.
-
Connection credential type: default.
-
AWS Secret: The name of the Secret Manager you created earlier (e.g. SalesforceSecret).
-
Additional URL parameter: Add these new parameters:
-
AuthScheme: Basic
-
User: ${User}
-
Password: ${Password}
-
SecurityToken: ${SecurityToken}
-
RTK: ${RTK}
Setting these parameters as variables make them retrieve the values from the Secrets manager.
-
Click Create connection.
Step 6: Create and run the Glue Job.
Create a job by selecting the connector and the connection that you created. You can easily create use the custom connector in your ETL jobs to load Salesforce data into an S3 bucket or any other destination. You can also use it to add, update, or delete Salesforce data in your Glue Jobs.