NOTE: This article will discuss how to continue processing the same payload through two REST calls while parsing values from the response along the way. While the application in this article is for Token authentication, there are additional applications to this, such as updating a payload with a key that must be determined via another API call.
The REST connector in CData Arc can be used to consume APIs in a similar fashion to Postman or curl. In many cases, any required authentication can be performed directly in the connector, but there is a form of authentication commonly known as Bearer Authentication that is typically a two step process:
-
Using secure credentials (typically with some combination of authentication in the headers or post body of the request) a request is issued to a server that returns a bearer token in the HTTP response of the request. This article will not go into depth about the authentication for this step since the token authentication that is used in this example can take many forms.
-
The bearer token is used for authentication, typically as an additional header (usually something like Authorization: Bearer <token>) in a subsequent API call to access a specific resource.
Ordinarily, the output of the REST connector is the response to the input message, but if you need to continue processing with the original payload, you will find the below approach shown in the screenshot would replace your original payload with the response from the first REST call:

Instead, there is an approach that will allow you to parse element of the HTTP response and continue processing the original message, using two features introduced in CData Arc 2023:
-
Use of the Show Success Path to continue processing of a successful request with the original input message.
-
Use of the Response Event of the REST connector to scan the HTTP response of the original message and update the processed message with additional headers.
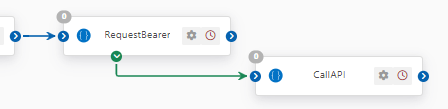
In CData Arc 2023, you will find that connectors now have a Show Success Path which can be accessed by right clicking on a connector:

This produces a green output arrow from the connector. While normal processing would output the result of the process, the Show Success Path continues processing with the original message:
This will allow you to continue your flow with a copy of the input message.
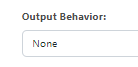
NOTE: Since the flow will not continue with the normal output of the REST connector, set the Advanced->Output Behavior to None to skip creating output messages:
You will still need to parse elements from the HTTP response of the REST call on the original message. To this end, there is a Response Event in the REST connector:

This Response event provides two items that you can interact with in ArcScript to parse the HTTP response (the _response item) and to enrich the message context of the continued message (the _message item).
Included here are two sample responses to an HTTP request, one in application/xml and one in application/json:
XML:
<response>
<token>abcdefg</token>
</response>
JSON:
{
"token": "abcedfg"
}
And two sample scripts that parse that response and add a new token header to the continued message:
Sample XML response parser using xmlOpen and xmlDOMGet:
<!-- Code goes here -->
<arc:set attr="xml.text" value="[_response.body]" />
<arc:set attr="xml.map:token" value="/response/token" />
<arc:call op="xmlOpen" item="xml">
<arc:call op="xmlDOMGet" item="xml">
<arc:set attr="_message.header:token " value="[xml.token]" />
</arc:call>
</arc:call>
Sample JSON response parser using jsonOpen and jsonDOMGet:
<!-- Code goes here -->
<arc:set attr="json.text" value="[_response.body]" />
<arc:set attr="json.map:token" value="/json/token" />
<arc:call op="jsonOpen" item="json">
<arc:call op="jsonDOMGet" item="json">
<arc:set attr="_message.header:token " value="[json.token]" />
</arc:call>
</arc:call>
The desired result is that a copy of the input message is continued, but now with an additional token message header that can be resolved in a later step in the message processing.
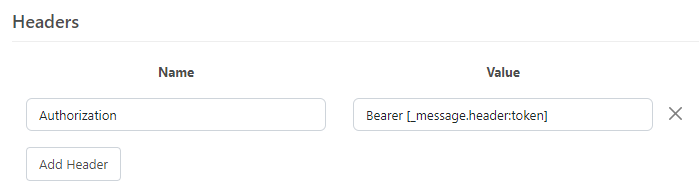
If for example, the token is needed as a value in an authorization header in a subsequent step, you can resolve that value dynamically in the headers of the REST request. In most cases, you would begin by setting the Authentication Type to None (since you are going to manually authenticate with additional headers:

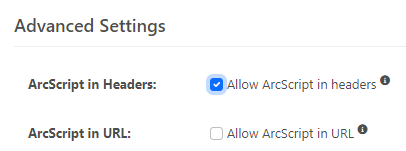
Then, allow the use of ArcScript in the headers of the REST connector. This setting is available within the Advanced tab:
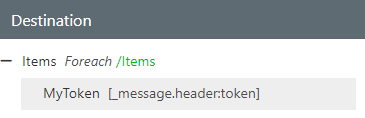
Finally, you can prepare the authorization header using the same _message item:
Alternately, if you wish to update the body of your request with this value, the same [_message.header:token] expression can be resolved in the XML Map connector to resolve to the value of the header.