This Knowledge Base article provides a step-by-step guide on using Apache JMeter to perform load testing or benchmarking with CData’s Salesforce JDBC driver. It explains how to configure JMeter to simulate multiple users interacting with Salesforce, measure system performance under load, and identify potential performance bottlenecks. This approach is especially useful for troubleshooting performance issues that may be reported by customers, allowing you to pinpoint the root causes and optimize the system for better scalability and responsiveness.
Prerequisites
Before proceeding with the steps in this guide, ensure that the following are set up on your system:
-
CData JDBC Driver for Salesforce installed.
-
Apache JMeter installed.
-
Access to a Salesforce account with appropriate credentials (username, password, and security token).
Step 1: Install the CData JDBC Driver for Salesforce
To begin, you need the CData JDBC driver for Salesforce, which allows JMeter to interact with Salesforce using SQL queries.
1.1 Download the JDBC Driver
-
Download the latest version of the CData JDBC Driver for Salesforce from the CData website.
-
The driver is typically named CData.jdbc.Salesforce.jar.
1.2 Install the Driver
-
Extract the contents of the downloaded ZIP file, if applicable.
-
Place the .jar file in a directory of your choice for easy access.
Step 2: Set Up Apache JMeter for JDBC Testing
2.1 Download and Install Apache JMeter
-
Download Apache JMeter from the official JMeter website.
-
Extract and install JMeter on your system following the provided instructions.
2.2 Add the CData JDBC Driver to JMeter
-
Copy the CData.jdbc.Salesforce.jar file into the lib/ext folder of your JMeter installation directory. Example path: <JMeter Home>/lib/ext
This allows JMeter to load the Salesforce JDBC driver during test execution.
2.3 Launch JMeter
-
Navigate to the bin directory in your JMeter folder.
-
Run the script for your operating system:
-
Windows: jmeter.bat
-
Mac/Linux: jmeter.sh
This will launch the JMeter GUI, where you can start creating your test plan.
Step 3: Create a JMeter Test Plan
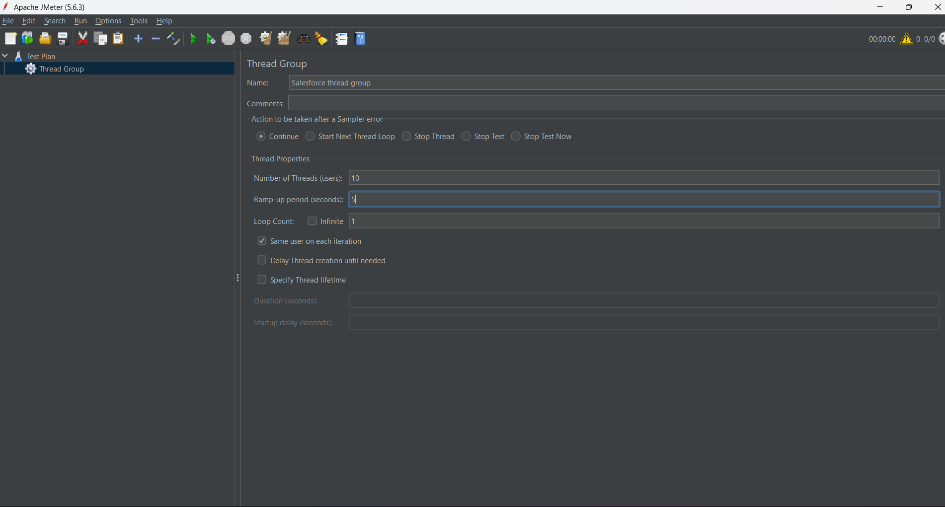
3.1 Add a Thread Group
-
In JMeter, right-click on the Test Plan node.
-
Select Add > Threads (Users) > Thread Group.
The Thread Group allows you to define:
-
Number of Virtual Users: The number of users to simulate.
-
Ramp-up Period: Time in seconds for JMeter to gradually start all users.
-
Loop Count: Number of times the test will run.4
3.2 Configure the JDBC Connection
-
Right-click on the Thread Group node and select Add > Config Element > JDBC Connection Configuration.
-
Configure the following properties:
-
Variable Name: Set a name for the connection (e.g., salesforce_connection).
-
JDBC Driver Class: Enter the driver class for Salesforce:
cdata.jdbc.salesforce.SalesforceDriver.
-
Database URL: Enter your Salesforce connection URL in this format:
jdbc:salesforce:User=your_username;Password=your_password;SecurityToken=your_token;.
-
Username: Enter your Salesforce username.
-
Password: Enter your Salesforce password.

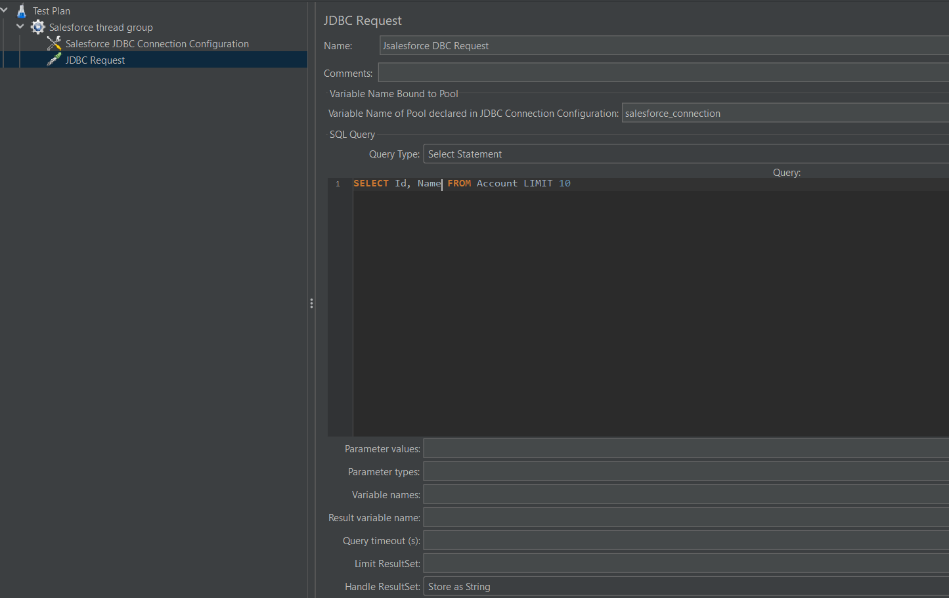
3.3 Add a JDBC Request Sampler
-
Right-click on the Thread Group node, select Add > Sampler > JDBC Request.
-
Configure the following properties:
-
Variable Name: Use the same name as the JDBC connection configuration (e.g., salesforce_connection).
-
Query Type: Select the query type (e.g., Select Statement).
-
SQL Query: Enter a valid SOQL query for Salesforce, such as:
SELECT Id, Name FROM Account LIMIT 10.
3.4 Add Listeners for Results
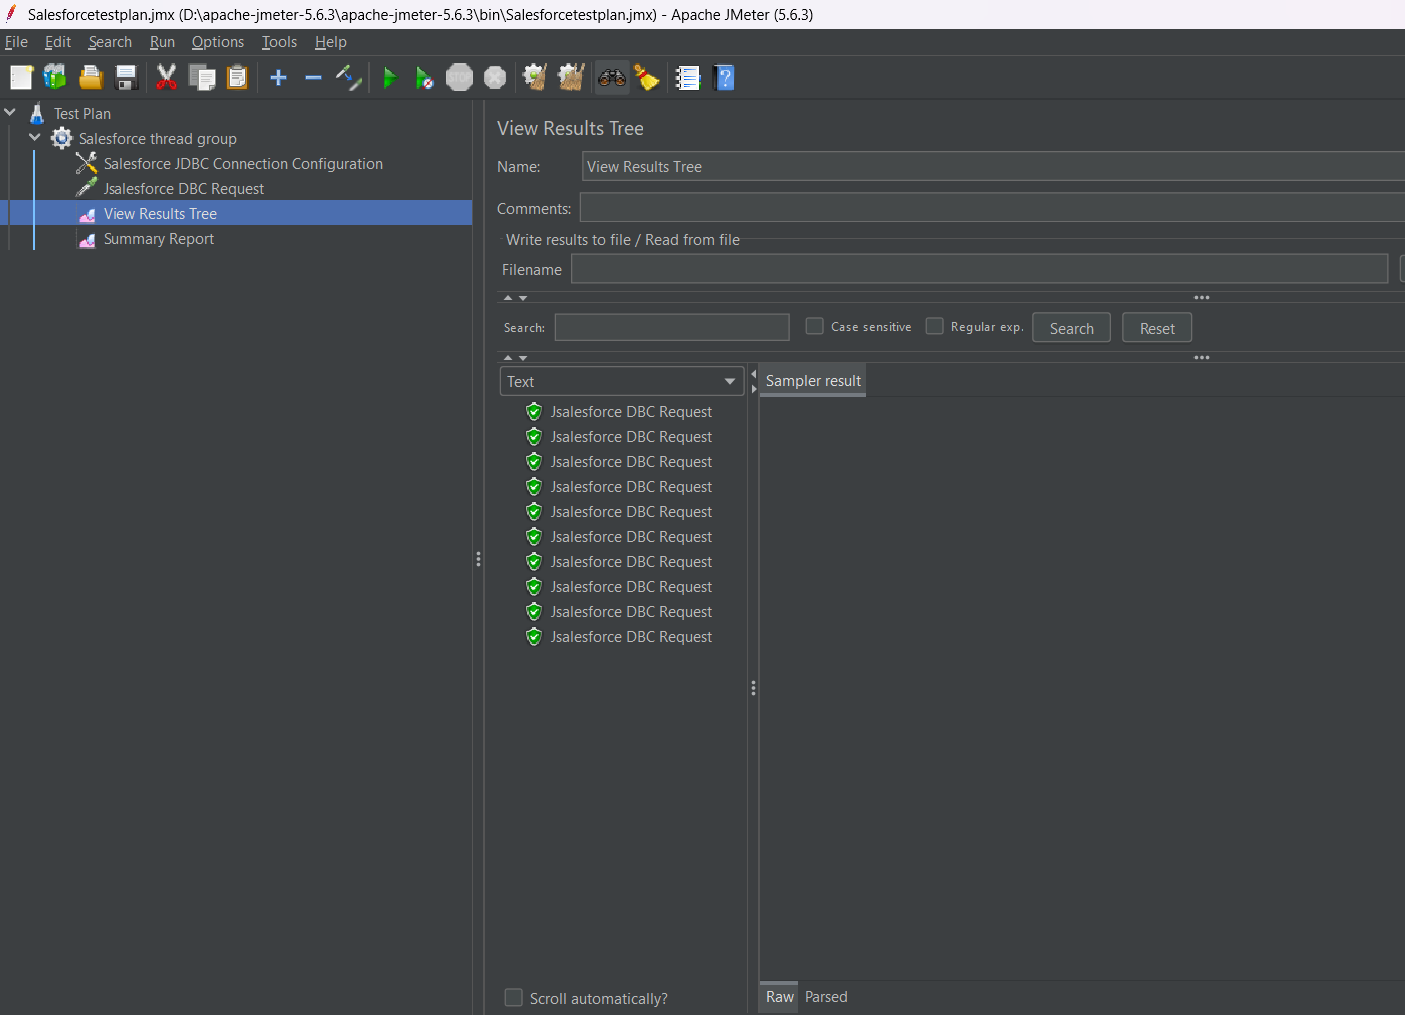
To view test results, right-click on the Thread Group node, then select Add > Listener. You can add listeners like:
-
View Results Tree – to visualize request/response data.
-
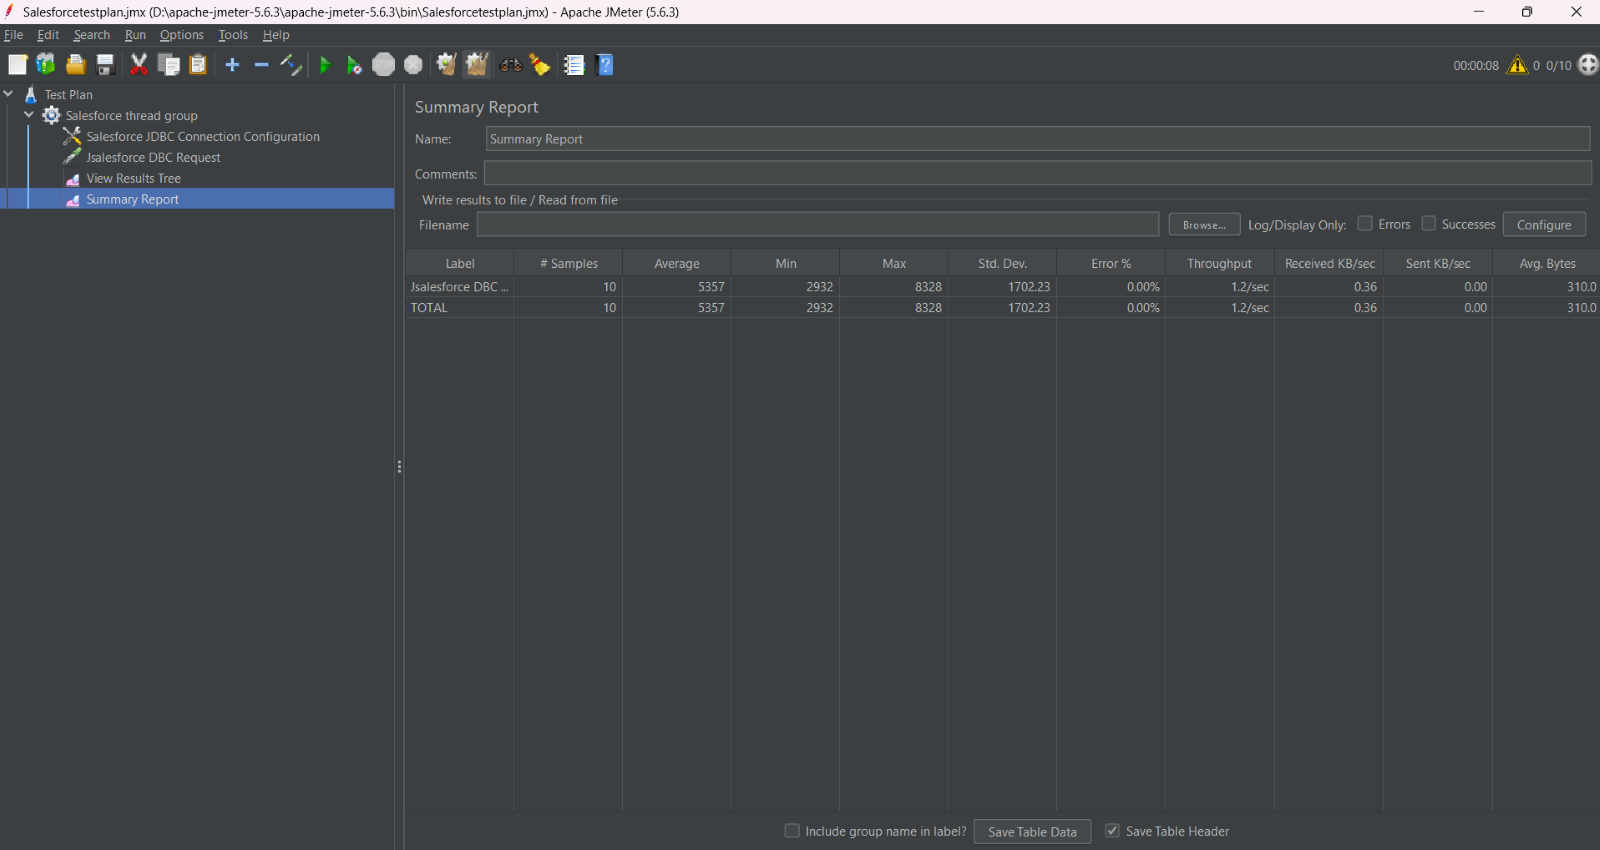
Summary Report – to view metrics such as average response time, throughput, and error rate.
Step 4: Configure and Run the Load Test
4.1 Configure Load
Adjust the settings in the Thread Group to simulate load:
-
Number of Threads (Users): Set the number of virtual users to simulate.
-
Ramp-up Period: Set how long it takes for JMeter to gradually increase the load (in seconds).
-
Loop Count: Specify how many times the test should run (for continuous load, use a higher value or set it to "Forever").
4.2 Start the Test
Click the Start button (green play icon) in the toolbar to run the load test. JMeter will begin sending requests to Salesforce, simulating the defined number of virtual users.
4.3 Monitor and Analyse Results
Once the test is running, you can monitor the results in real time using the listeners you added. Key performance metrics to watch include:
-
Response Times: How long it takes for Salesforce to respond to each request.
-
Throughput: The number of requests per second or minute.
-
Error Rate: Any errors encountered during the test.
Step 5: Analyze and Optimize Performance
After running the load test, analyze the results to assess system performance:
5.1 Key Metrics to Review:
-
Response Times: Review the average, minimum, and maximum response times for the queries.
-
Throughput: Check how many requests per second or minute the system can handle under load.
-
Error Rate: Monitor the frequency of errors, which may indicate performance issues.
5.2 Optimization Suggestions:
-
Optimizing Queries: Ensure your SOQL queries are efficient. Avoid SELECT * queries and select only the necessary fields.
-
Salesforce API Limits: Be mindful of Salesforce API rate limits when running load tests. Ensure your test doesn't exceed the maximum allowed API requests per day.
-
Server and Network Configuration: Optimize your Salesforce integration and consider improving network settings to ensure requests are processed efficiently.
Conclusion:
By following the steps outlined in this article, you can effectively use JMeter with the CData Salesforce JDBC driver to:
-
Simulate realistic load on Salesforce and evaluate system performance, helping to assess how the platform performs under typical and peak usage conditions.
-
Identify performance bottlenecks in your Salesforce integration, such as slow queries, database connection limits, or network-related issues, which may affect application performance.
-
Optimize queries and configurations for improved performance and scalability, ensuring that Salesforce can handle higher loads without degradation of service.
By conducting these performance tests, you can proactively troubleshoot performance issues reported by customers, allowing for quicker resolution and more efficient system optimization.